![[rss feed 圖案]](/~ckhung/i/rss.png)
Greg's Supplementary Database Notes
sqlite3 export
To export a sqlite3 database instance as a sql script file,
use the .output and the .dump
commands. See
tutorial for details.
To export a sqlite3 database instance as a set of csv files:
- Use
.tablesto show the list of table names and paste them to a text file table-list.txt . - Generate a shell script from table-list.txt:
perl -ne 'print qq(sqlite3 -header -csv chinook.db "select * from $1;" > $1.csv\n) if /(\w+)/' table-list.txt > export.sh - Try one command from export.sh . If it works all right,
then
source export.shorbash < export.sh
exploring Sakila sample database using sqlite

 Please download
sqlite-sakila.db and open it in your litecli or sqlite3.
This sample database is created from
these *.sql files.
Take a look at its schema.
Pay special attention to the "create view as ..." statements.
The two ER Diagram are equivalent. Either one will do.
Please download
sqlite-sakila.db and open it in your litecli or sqlite3.
This sample database is created from
these *.sql files.
Take a look at its schema.
Pay special attention to the "create view as ..." statements.
The two ER Diagram are equivalent. Either one will do.
- Create a view "inventory_list" of inventory id, store id, film id, and film title of every inventory item. Sort them by film title, like this.
- Create a view "address_list" of address_id, country name, city name, and address of every address. Sort them by country name, city name, and address, like this.
- Create a view "film_list" of film_id, category name, film length, film rating, and film title for every film. Sort them by film length, like this.
- Create a view "rental_summary" of rental id, total payment (called "revenue", for each rental), inventory id, and customer id for every rental. Sort them by total payment, like this.
- Does the above sum up the same as the sum on the original payment table? Find out what causes the discrepency.
See the comments in the source code for answers.
Try to find out how much revenue (rental payment) each customer brings in, how much revenue each film brings in, and how much revenue each category of film brings in.
Regular Expressions
Consider
this page. Let's save the formatted text:
lynx -dump https://nypost.com/article/zodiac-signs-dates-personality-traits/ > zodiac.txt
and try to create a table out of the summary info in zodiac.txt
for all the 12 zodiac signs.
- Print the sign names such as "ARIES".
- Print the calendar range for each sign such as "MARCH 21 -- APRIL 19". Note: please replace the non-ascii character – with the ascii character "-".
- Print the Element such as "Fire".
- Can you print all the 5 pieces of info "Element", "Quality", "Power Color", "Ruling Planet", and "Symbol" for all signs, printing 60 lines in total, using one signle regex command?
The output of each command can be saved as a text file containing 12 lines, After producing all these text files separately, You can then use the paste command to combine them into a csv file.
mysql setup
Install: sudo apt install mysql-server mysql-client
Mysql has its own user management, which is independent of
the linux user management. (At least on debian-based systems)
The root user of mysql, however, is special in that
(1) by default it does not require a password to login and that
(2) only the linux root user can login as
the mysql root user. So we run from shell sudo mysql -u root
Now in the mysql cli:
# DROP USER 'root'@'localhost';
# Some people delete the root user but this is not a popular strategy:
# https://dba.stackexchange.com/questions/46903/deleting-the-mysql-root-user-on-purpose
CREATE USER 'XXX'@'localhost' IDENTIFIED BY 'YYY';
GRANT ALL PRIVILEGES ON *.* TO 'XXX'@'localhost' WITH GRANT OPTION;
From now on you can mysql -u XXX -p as a normal user.
ref: SO.
Next we proceed to download and use a sample database
of a company selling vehicles:
mkdir ~/db
cd ~/db
wget https://downloads.mysql.com/docs/world_x-db.tar.gz
tar xvzf world_x-db.tar.gz
ls -trl
cd world_x-db
less world_x.sql
mysql -u XXX -p
Then in the mysql shell:
\h
show databases;
\! ls
\. world_x.sql
show databases;
\u world_x
show tables;
select * from country;
# drop database world_x;
Now install and take a look at a few more sample databases in a similar way: mysqlsampledatabase (vehicle vendor) and sakila-db.tar.gz (film vendor). You could also go to the mysql subdirectory of the Sakila example database, download mysql-sakila-schema.sql and mysql-sakila-insert-data.sql, and execute these inside mysql. You want to turn off autocommit before you do bulk insertion, or else it would take an incredibly long time. See this Q&A on SO. Here is a full list of MySQL commands w/ examples.
DBeaver
Installing dbeaver: sudo bash as root, and then:
wget -O - https://dbeaver.io/debs/dbeaver.gpg.key | apt-key add -
# that means you trust software provided by dbeaver.io
echo "deb https://dbeaver.io/debs/dbeaver-ce /" > /etc/apt/sources.list.d/dbeaver.list
apt update
apt install dbeaver-ce
See this article for more details.
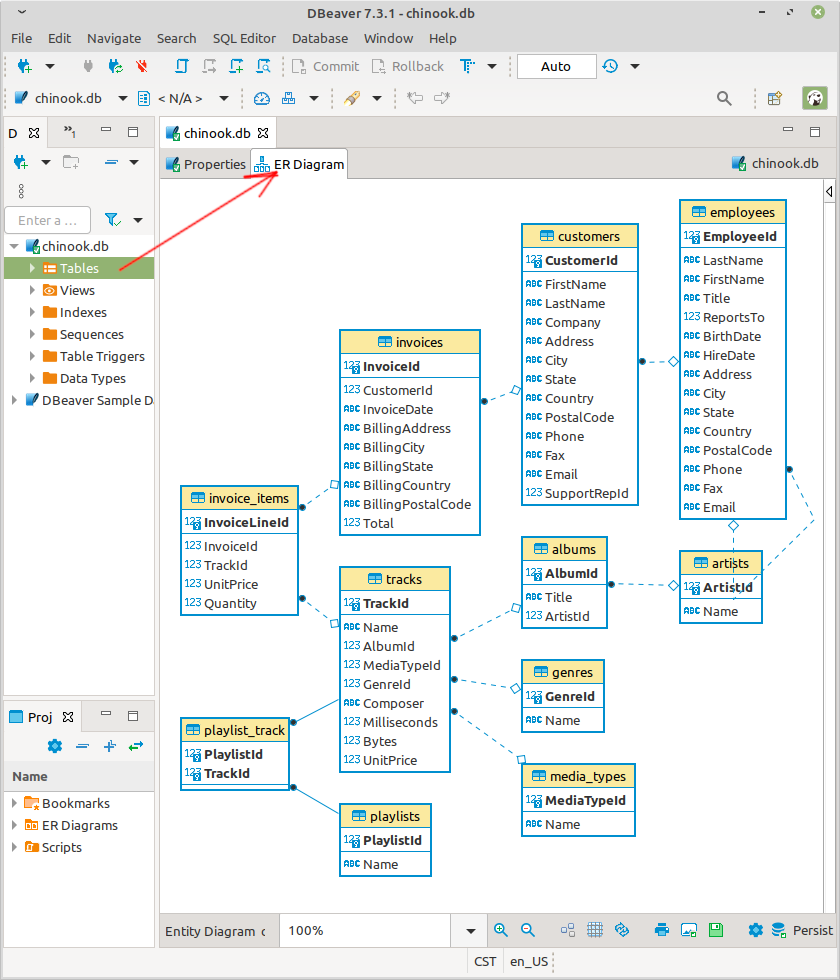
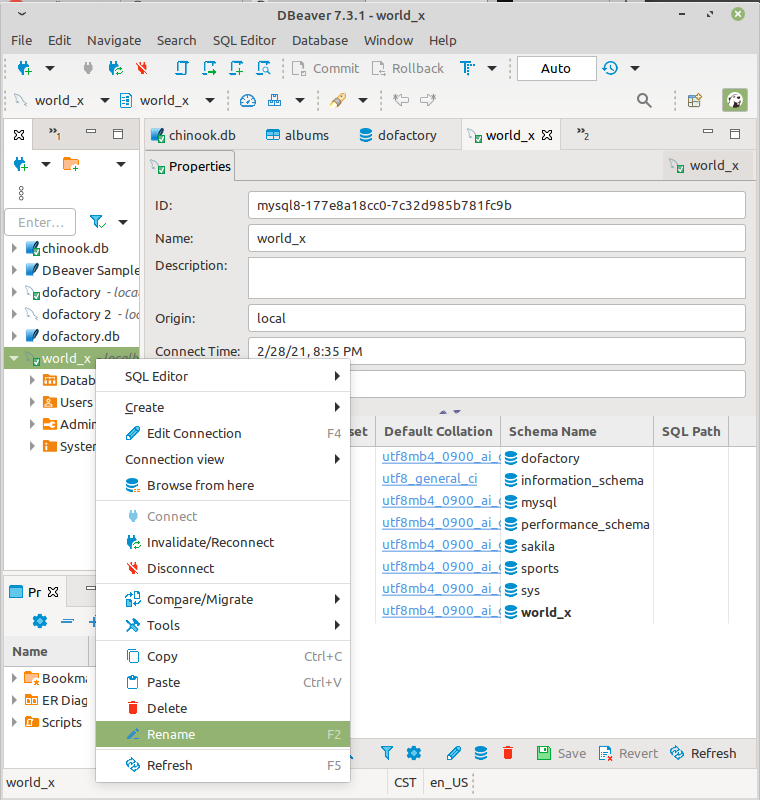
importing a sqlite database into DBeaver
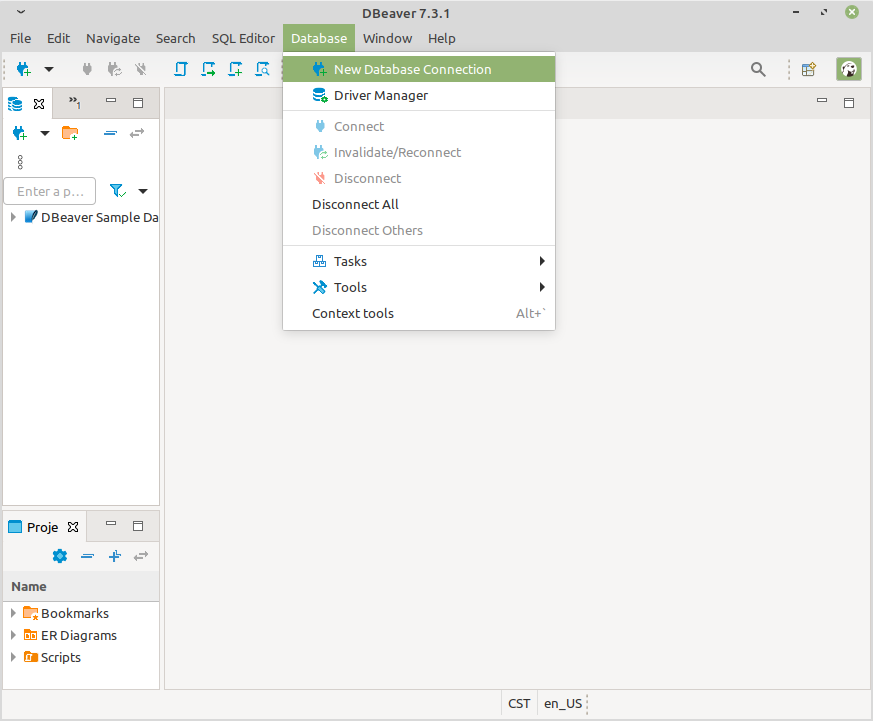
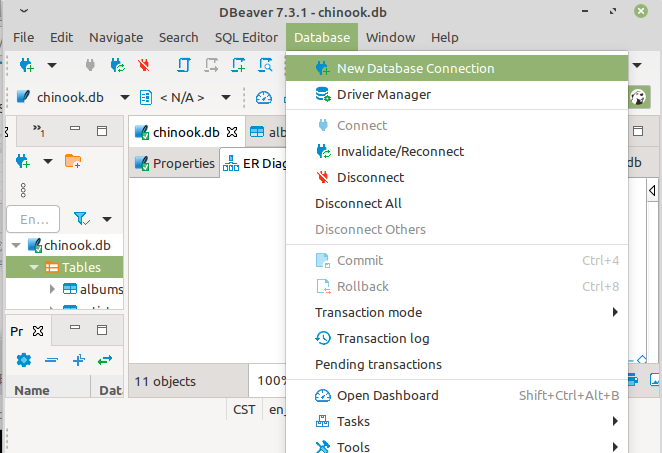
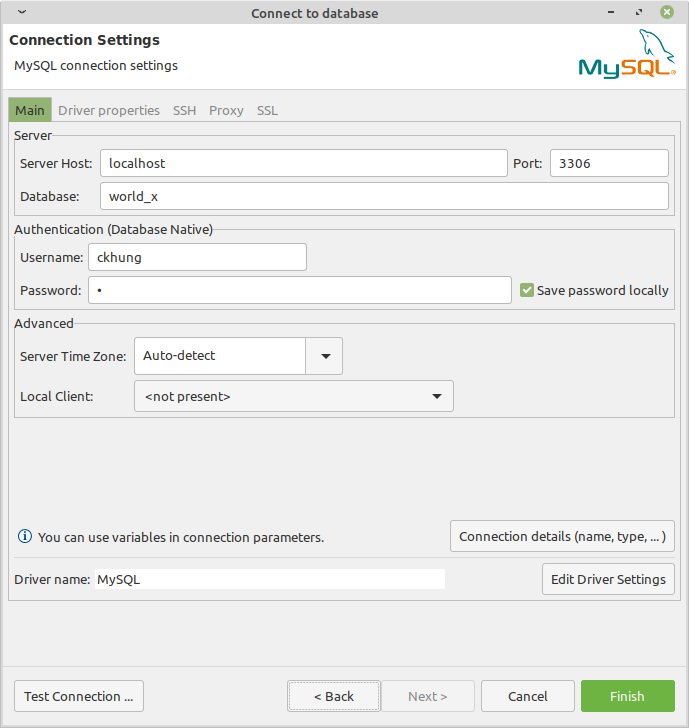
Connecting to the localhost instance of mysql DBMS:
Generating ER Diagram from Mysql Schema
 One can generate an ER Diagram given a mysql schema definition
without actually creating the database in mysql.
See
ckhung/json2erd.py for a general description and the links
to the required software pieces.
Here are the precise steps to reproduce two kinds of ER Diagram
as .svg files.
One can generate an ER Diagram given a mysql schema definition
without actually creating the database in mysql.
See
ckhung/json2erd.py for a general description and the links
to the required software pieces.
Here are the precise steps to reproduce two kinds of ER Diagram
as .svg files.
cd ~

wget https://downloads.mysql.com/docs/sakila-db.tar.gz
tar xvzf sakila-db.tar.gz
less sakila-db/sakila-schema.sql

wget https://github.com/iamcal/SQLParser/archive/refs/heads/master.zip -O SQLParser-master.zip
unzip SQLParser-master.zip
nano SQLParser-master/src/SQLParser.php
# find this line:
# case 'BINARY':
# add beneath it this line:
# case 'BOOLEAN':

cd SQLParser-master/
wget https://gist.githubusercontent.com/ckhung/c208ad5b72e7ebe216fd0bfc7fb1cb7a/raw/c02e9c7b947949ea56cd9a3c67300702c0d05611/pmysql.php
wget https://gist.githubusercontent.com/ckhung/c208ad5b72e7ebe216fd0bfc7fb1cb7a/raw/c02e9c7b947949ea56cd9a3c67300702c0d05611/json2erd.py
php pmysql.php ../sakila-db/sakila-schema.sql | python3 json2erd.py -t busu > ../sakila.er
php pmysql.php ../sakila-db/sakila-schema.sql | python3 json2erd.py -t ehne > ../sakila.erd.json

cd -
less sakila.er
# This will be the input file to BurntSushi/erd
less sakila.erd.json
# This will be the input file to ehne/ERDot

sudo apt install haskell-stack
stack upgrade
wget https://github.com/BurntSushi/erd/archive/refs/heads/master.zip -O erd-master.zip
unzip erd-master.zip
cd erd-master/
stack install
echo $PATH
# make sure ~/.local/bin/ is in $PATH
erd < ../sakila.er -f svg > ../sakila.busu.svg
# open the .svg file from the browser
cd -

pip3 install ERDot
erdot sakila.erd.json
ls -l sakila.dot
dot -Tsvg sakila.dot > sakila.ehne.svg
# open the .svg file from the browser
Mysql "key" concepts

index: is implemented using a data structure such as b-tree to improve search efficiency.- In mysql, declaring a column as
keyis equivalent to declaring it asindex. - Mysql index: introduction, efficient design
- A
uniquekeywhich isnot nullis a candidate key. - The
primary keyis aunique keywhich isnot null.
"Join" examples
The dofactory sample database can be converted to sqlite3 format using the MS sql to sqlite3 converter. In the following we use sqlite3 to play with the converted version.
.tables
PRAGMA table_info(COrder)
PRAGMA table_info(OrderItem)
select co.Id, co.CustomerId, oi.Id, oi.ProductId, oi.UnitPrice, oi.Quantity from COrder as co join OrderItem as oi on co.Id = oi.OrderId
PostgreSQL
 Note: Change all "ckhung" to "stux" or whatever your
linux login user name is.
Note: Change all "ckhung" to "stux" or whatever your
linux login user name is.
sudo apt update
sudo apt install postgresql postgresql-contrib
sudo -i -u postgres
# Note that now you become the "postgres" user!
createuser ckhung
# ask the "postgres" user to make me ("ckhung")
# a PostgreSQL DMBS user and allow me to create my own databases
wget https://www.postgresqltutorial.com/wp-content/uploads/2019/05/dvdrental.zip
unzip dvdrental.zip
ls -l dvdrental.*
createdb dvdrental
pg_restore -c --if-exists -d dvdrental dvdrental.tar
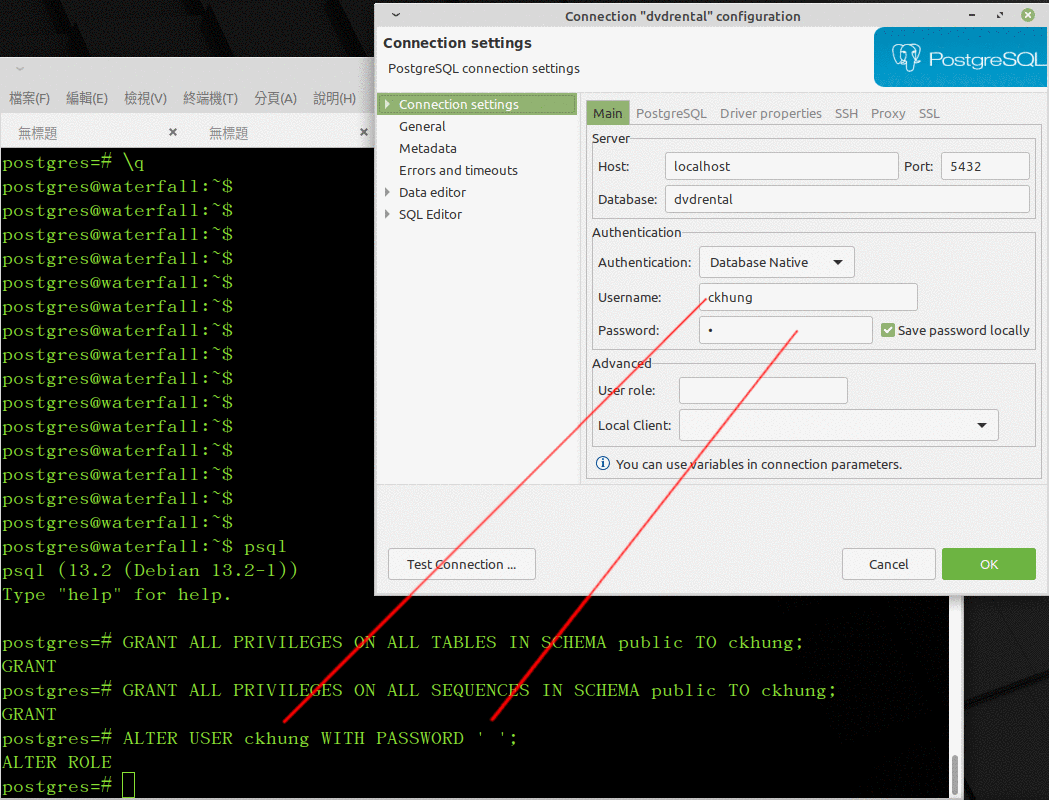
Now type psql dvdrental to enter the
psql interactive command line interface, and then:
help
\?
\dt
GRANT ALL PRIVILEGES ON ALL TABLES IN SCHEMA public TO ckhung;
GRANT ALL PRIVILEGES ON ALL SEQUENCES IN SCHEMA public TO ckhung;
ALTER USER ckhung WITH PASSWORD ' ';
Now press ^D to exit psql and press ^D again to exit sudo.
You are back into your own linux login user.
You can use psql dvdrental to use the databas
without password. It's called
ident authentication.
For a dbeaver connection, however, you need the password
because it goes through ODBC.
See this page for postgresql configuration on ubuntu. See this page for pgadmin4 installation. The pgadmin3 bundled with mint 20 is out of date.
SchemaSpy
SchemaSpy is a very powerful schema analysis tool. SchemaSpy-HOWTO gives a brief tutorial of using SchemaSpy to analyze postgresql databases. The following are steps for ubuntu based systems.
sudo apt install libpostgresql-jdbc-java graphviz
dpkg -L libpostgresql-jdbc-java | grep 'jdbc.*\.jar'
# Find out the exact path of your jdbc driver location.
# For me on mint 20, it's /usr/share/java/postgresql-jdbc4.jar
wget https://github.com/schemaspy/schemaspy/releases/download/v6.1.0/schemaspy-6.1.0.jar
java -jar schemaspy-6.1.0.jar -t pgsql \
  -s public -db dvdrental -u ckhung -p 'secretpassword' \
  -host localhost -o /tmp/SchemaSpy/ \
  -dp /usr/share/java/postgresql-jdbc4.jar
Replace dvdrental, ckhung, and secretpassword with
the correct values in your system.
There will be a lot of output files in /tmp/SchemaSpy/ .
You can then cd /tmp/SchemaSpy/diagrams/summary/ ;
dot -Tsvg relationships.real.large.dot > ~/dvdrental.svg
and open dvdrental.svg in your browser.
Here are the interim files
generated using SchemaSpy, further slightly modified (only the
image paths) for you to use as input to graphviz.
 To use schemaspy on a sqlite database, first download
a sqlite jdbc jar such as
sqlite-jdbc-*.jar (I downloaded the latest version 3.36.0.3)
Suppose we want to draw the ER Diagram for the
chinook database. Create a configuration file called
"sqlite.properties" containing the following:
To use schemaspy on a sqlite database, first download
a sqlite jdbc jar such as
sqlite-jdbc-*.jar (I downloaded the latest version 3.36.0.3)
Suppose we want to draw the ER Diagram for the
chinook database. Create a configuration file called
"sqlite.properties" containing the following:
description=SQLite
connectionSpec=jdbc:sqlite:<db>
driver=org.sqlite.JDBC
driverPath=sqlite-jdbc-3.36.0.3.jar
The "driver=..." line refers to the org/sqlite/JDBC.class
file in the jar file, as can be verified by
unzip -v sqlite-jdbc-3.36.0.3.jar | grep -i 'jdbc\.class'
Finally this command will generate the desired *.dot files
in /tmp/SchemaSpy/diagrams/summary/ along with many other files:
java -jar schemaspy-6.1.0.jar -t sqlite -o /tmp/SchemaSpy/
-sso -cat chinook -s chinook -db /full/path/to/chinook.db
The -db option must specify a full path, not a relative path.
See this issue.
appendix A. mysql reset password
To change the password of some user, say 'ckhung',
execute mysql as root, and then do this:
alter user 'ckhung'@'localhost' identified by 'new-password';
In mysql 8, if have set a password for the root user and you forget it, you can reset it by:
systemctl stop mysql
mkdir -p /var/run/mysqld
chown mysql:mysql /var/run/mysqld
mysqld_safe --skip-grant-tables &
Then you will be able to mysql -u root and see
the mysql prompt. Inside the mysql interpreter:
flush privileges;
update mysql.user set authentication_string=null where User='root';
exit
Back in the shell:
kill %1
systemctl start mysql
Now you should be able to mysql -u root as before.
See references:
SO,
zh_TW,
official doc .
appendix B. reinstalling mysql
If mysql is broken beyond repair and
if you don't mind losing all of your existing database instances,
then you can try the following as root to wipe out everything
and re-install mysql (that is, sudo bash
before doing the following)
apt remove --purge mysql-server mysql-client mysql-common
rm -rf /var/lib/mysql*
apt install mysql-server mysql-client
After that, you should be able to mysql -u root as before.
When re-installing mysql, if you see an error message like this:
ERROR: Unable to start MySQL server:
mysqld: Can't read dir of '/etc/mysql/conf.d/'
(OS errno 13 - Perm ission denied)
then you will have to
disable apparmor protection for mysql:
apparmor_parser -R /etc/apparmor.d/usr.sbin.mysqld
ln -s /etc/apparmor.d/usr.sbin.mysqld /etc/apparmor.d/disable/
Then you can try installing again.
appendix C. misc.
